
Yes this picture alone made me look at my hunter green canister set I got for $3.00 at a yard sale in total disgust. How to make your very own. There's technically two different ways..I just chose the more complex one it seems. First option which I didn't find out until today is there is vinyl decals for sale. The cheapest I found starting at $5.00 for # 1-3. But what about the canister sets with 4.
Second option which I did is this:
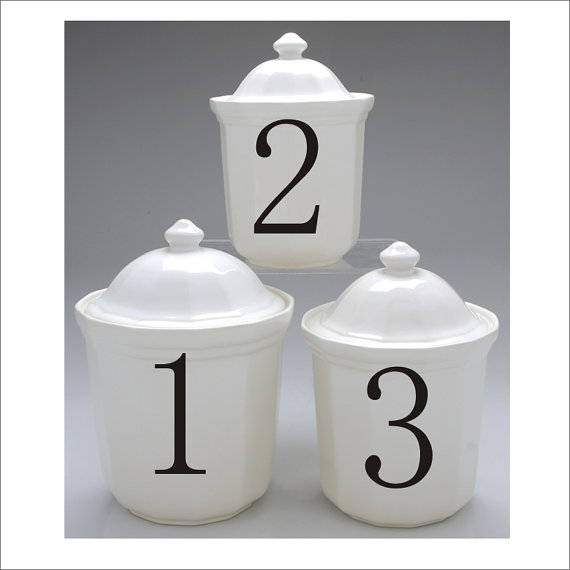
Here is my current canister set as it originally was.

The first thing I did was sand everything down with some fine grit sandpaper. You can buy it at your local hardware store for $2.00 or less. I did even run the sand paper across the ceramic canister a few times.
Next I spray painted the ceramic canister with an Ivory spray paint. If you're unsure if the paint you use is ok to come in contact with food don't spray the inside. I also spray painted the knobs on top of the covers white. I always use Krylon spray paint, I've yet to find a more suitable one.
For the canister lids I took some Minwax wood stain in the color Dark Walnut and applied it. If you're unsure how to use wood stain this brand has a full description on how apply it.
Finally comes the numbers! Now instead of actually going out and buying stencils I printed numbers on computer paper, cut them out and placed them on the canisters. I used a cheap brand of spray paint in the color black. My first attempt was a fail, and I've learned my lesson on buying cheap products. I had to completely redo that canister over again.
Once your canisters fully dry which I let them sit over night. You can re assemble them and look at your work. Here's my finished project!

<3 Jamie
Awesome job, they look great :)
ReplyDeleteThey look great!! Love the numbers!
ReplyDeleteI found your blog on Commona-my house blog and I just love any idea to recycle and renew any items. Your canisters look amazing, what a nice job you did.
ReplyDeleteI would love it if you would link up with us at my weekly Clever Chicks Blog Hop this week!
http://www.the-chicken-chick.com/2013/07/clever-chicks-blog-hop-45-with-three.html
I really love this! They turned out awesome- the crisp number against the freshly painted white. Great job upcycling!!
ReplyDeleteThanks so much for linking up at the Inspiration Monday Party this week! I was so excited to guest host and to get to see so many fabulous new projects and blogs! Have a great week:)
Krista @ the happy housie
Love how you redid these. They turned out great.
ReplyDeleteCutest little canisters ever! Very resourceful girl. Love them. Have a wonderful day! Love,Wanda
ReplyDeleteThey look awesome! I may have to do something to my green canisters once our kitchen is finished and I actually have counter space to put them on! Great idea!
ReplyDeleteLove these, I have white canisters already with a flat wood top....this makes me think I need to do a little upgrading to them.
ReplyDeleteI love what you did with them. Anyone else would of thrown them away or put in the garage sale! Thanks for linking up to Show me the Godds month end link party!
ReplyDeleteHi
ReplyDeleteYou've been featured at Sew Crafty Angel today.
Angel
Super cute idea! Thanks for linking to my Pin Me Linky Party.
ReplyDeleteBeautiful upgrade! I'd love for you to link up to The DIY'ers! http://homecomingmn.blogspot.com/2013/08/the-diyers-and-my-new-rug.html
ReplyDeleteYour canisters look awesome after their redo - Welldone!!
ReplyDeleteThanks so much for linking up on Tutorial Thursdays Linky Party. Please take a moment to cast your vote on your favourite link from last week :) I look forward to seeing what you share with us this tomorrow.
x
Natalie
Marigolds' Loft
I love how these turned out, I'm in need of some and you've inspired me to find an old set and give them new life! I'm stopping by to let you know you've been featured at the TGIF Link Party this week! I hope you'll stop by to grab a button and link up with us again!
ReplyDeletehttp://www.livingbettertogether.com/2013/08/tgif-link-party-no-8.html#
Aquarium filters area unit necessary in order that your tank are free from the material that fish and marine animals offer out as a part of their biological processes, for more information visit here Andrew's site.
ReplyDelete